Yes. XGEN Technologies provides you with unlimited access to update and make changes to your Website via FTP or FrontPage 24 hours a day.
Netscape 7.0 Mail Setup
- Open Netscape Mail 7.x.
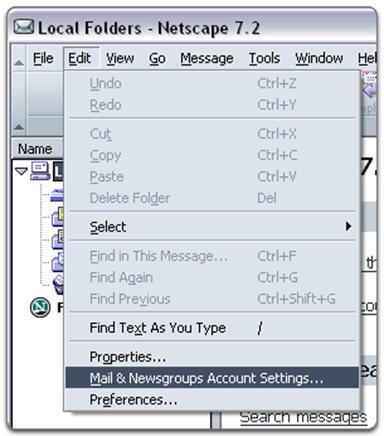
- Click ‘Edit,’ and select ‘Mail & Newsgroups Account Settings…’
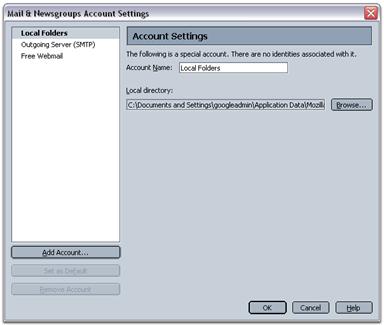
- Click ‘Add Account…,’ and click ‘OK.’
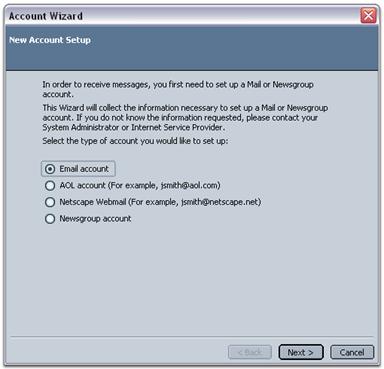
- Choose ‘Email account,’ and click ‘Next.’
- Enter your name in the ‘Your Name:’ field.
- Enter your full email address (username@yourdomain.tld) in the ‘Email Address:’ field, and click ‘Next.’
- Select ‘POP’ and enter ‘mail.yourdomain.tld’ in the ‘Incoming Server:’ field.
- Enter ‘mail.yourdomain.tld’ in the ‘Outgoing Server:’ field.
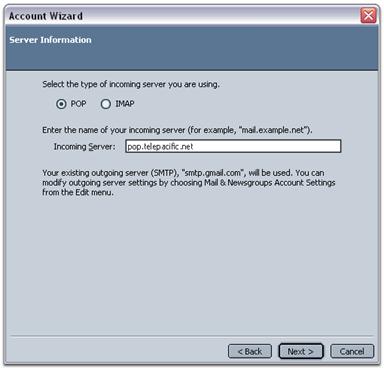
- Click ‘Next.’
- Enter your username (including ‘@yourdomain.tld’) in the ‘Incoming User Name:’ field and the ‘Outgoing User Name:’ field, and click ‘Next.’
- Enter a name for your Netscape Mail account in the ‘Account Name field,’ and click ‘Next.’
- Click ‘Next,’ and then click ‘Finish.’ (Don’t worry if you get an error message indicating that you cannot connect to mail.yourdomain.tld. Just click ‘OK,’ and continue with the steps below.)
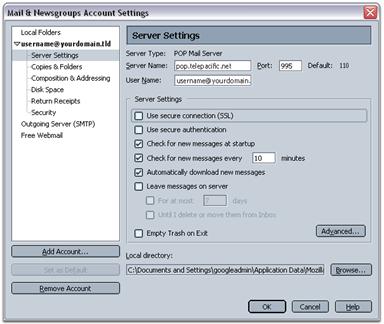
- Open the ‘Edit’ menu, and select ‘Mail and Newsgroups Account Settings.’
- The ‘Port’ should read 110.
- Enter ’25’ in the ‘Port:’ field.
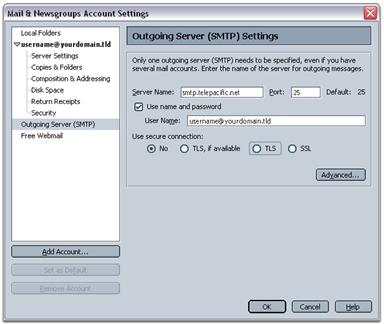
Congratulations! You’re done configuring your client to send and retrieve messages.
EUDORA 5.2.1 Mail Setup
https://www.xgentech.com/wp-content/uploads/2019/05/
You can get a freeware version of Eudora Mail at http://www.eudora.com/download/.
To setup your Eudora Mail 5.2.1 to handle your new POP3 e-mail account, please follow the instruction below :-
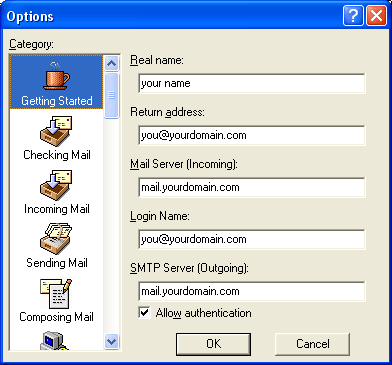
1. Select Tool -> Options… to start the Options dialog box.
2. Then select Getting Started in the Category
3. Enter the name you wish to appear to others when they receive your mail under the Real Name.
4. Enter the return address you wish to appear on your E-mail (you@yourdomain.com) under the Reply Mail.
5. Enter mail.yourdomain.com (replace yourdomain.com with your proper domain) under Mail Server (Incoming)
6. Enter your full email address under this domain (e.g. you@yourdomain.com) for your Login Name
7. Enter mail.yourdomain.com (replace yourdomain.com with your proper domain) under SMTP Server (Outgoing)
8. And ensure that the Allow Authentication box is checked
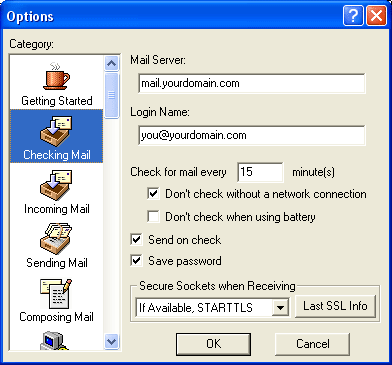
9. Click on Checking Mail
10. Ensure that the Mail Server reads mail.yourdomain.com
11. Make sure your Login Name is the same as before and is correct
12. Leave the rest of the options as default
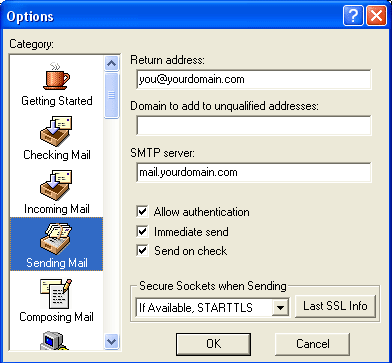
13. Click on Sending Mail
14. Ensure that the Return Address reads the correct reply address or simply leave blank.
15. Ensure that the SMTP Server reads mail.yourdomain.com
16. Ensure that the Allow Authentication box is checked
17. Click OK to save your mail account settings.
– END –
How do I Setup Auto-Responder?
Login to http://mail.yourdomain.com
On Main Menu under Option, click ‘Auto Response’
To enter or change message:
In the Message Box, enter your message. You can enter up to 1000 characters.
Click Save.
This message will be sent once to each user that sends you mail. When mail is received for a particular user ID, a prepared message is sent back to the sender.
How Do I Setup Catch-All Addresses?
Login to http://mail.yourdomain.com
On Main Menu under Administration, click ‘Alias Administration’
In Alias Administration Menu, Click the Add Alias button.
In the Alias text box, enter a name called “nobody” for the alias.
In the Destination text box, enter A Standard Alias (in this case admin), so that all mail sent to Yourdomain.com will forward to Admin@Yourdomain.com.
After entering the alias properties, click OK to add the alias. The new alias is added to the list of registered aliases.
The use of nobody alias also prevents messages from bouncing back
incorrectly-addressed mail to sender.
How Do I Setup Email Aliases?
If you wish to remove or add an alias to a POP account, you can do so at any time.
Login to http://mail.yourdomain.com
On Main Menu under Administration, click ‘Alias Administration’
In Alias Administration Menu, Click the Add Alias button.
In the Alias text box, enter a name for the alias.
Alias names are limited to 45 characters and must be created from the character set of digits and letters. The underline (_) and hyphen (-) characters are valid. The name cannot contain spaces and must be unique within the system.
In the Destination text box, enter one of the following:
A Standard Alias
A standard alias can point to a single userid on the same system, multiple
userids on the same system, a remote e-mail address, multiple e-mail addresses, another alias, or any combination of the same.
A List Alias
A list alias points to a file that contains a list of valid mail addresses, one
per line.
After entering the alias properties, click OK to add the alias. The new alias is added to the list of registered aliases.
