Outlook 2016 Mail Setup
- Step 1: Launch Outlook. Select File on the top left menu bar. Select Info and Account Settings. Select the Add Account button in the middle of the screen, then Account Settings
Step 2: . Insert your email address Select Advanced options, then select Let me setup my account manually > Connect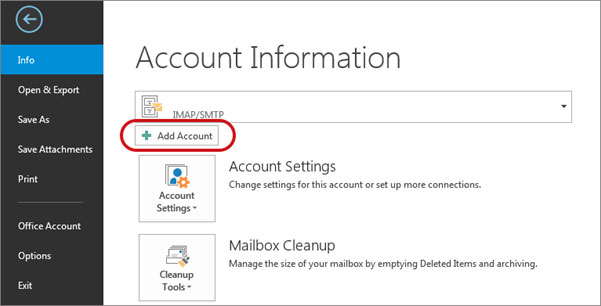
Step 3: This screen will display the various account options – select IMAP (or POP)>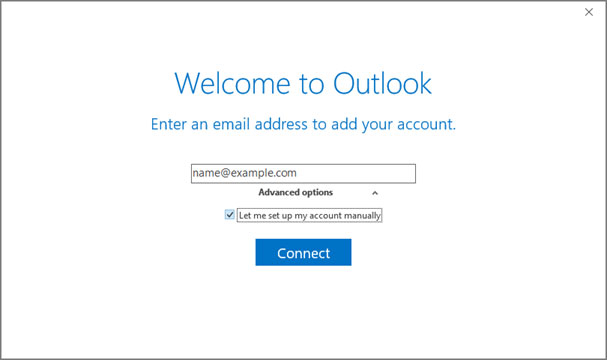
Step 4: Server Settings: Please make sure you enter the below incoming and outgoing server details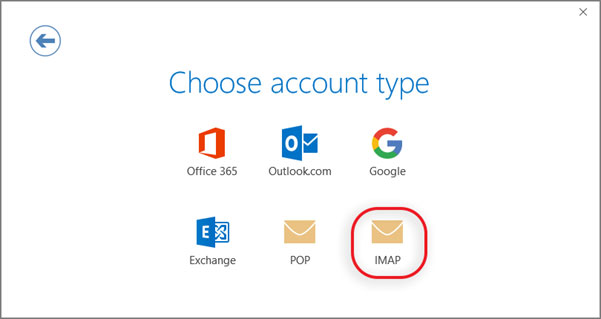
Incoming mail: You can choose to go for POP or IMAP. Below are the settings. POP port settings for yourdomain.tld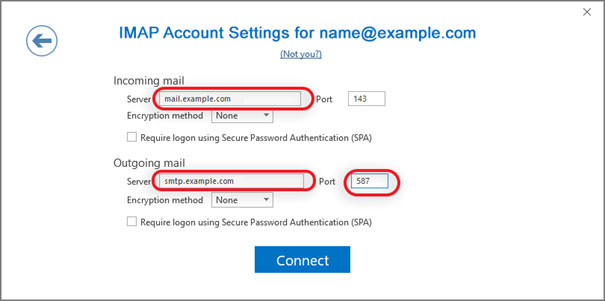
- Incoming Port: 110, Outgoing Port: 587
- General settings for POP
- Secure – Port: 995 and Security Type: SSL/TLS (Accept all certificates)
- Insecure – Port: 110 and Security Type: None (Accept all certificates)
- Not ticked: This server requires an encrypted connection (SSL)
- Use the following type of encrypted connection is None
- Incoming Port: 143, Outgoing Port: 587
- Secure – Port: 993and Security Type: SSL/TLS (Accept all certificates)
- Insecure – Port: 143 and Security Type: None (Accept all certificates
- Not ticked: This server requires an encrypted connection (SSL)
- Use the following type of encrypted connection is None
- Outgoing (SMTP) Secure – Port: 465 for and Security Type: SSL/TLS (Accept all certificates)
- Outgoing (SMTP roaming server) Secure – Port: 587 and Security Type: SSL/TLS (Accept all certificates)
- Outgoing (SMTP) – Port: 25 and Security Type: None (Accept all certificates)
- Outgoing (SMTP roaming server) Insecure – Port: 587 and Security Type: None (Accept all certificates)
Congratulations! You are all done here and ready to use your email account on Outlook 2016.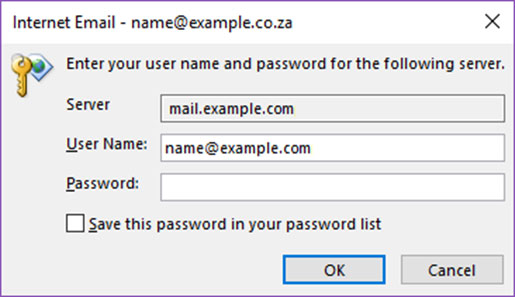
Outlook 2013 Mail Setup
Step 1: Launch Outlook. Select File on the top left menu bar. Select Info and Account Settings
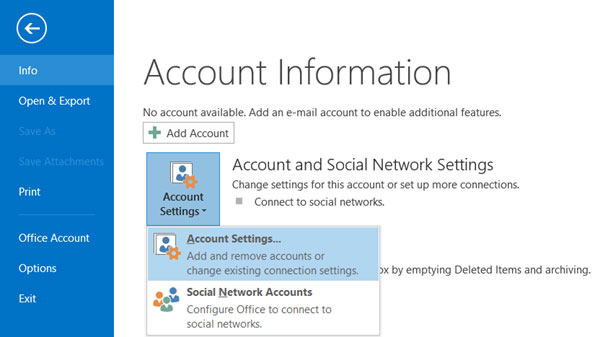
Step 2: Choose Manual Setup or additional server types > Next
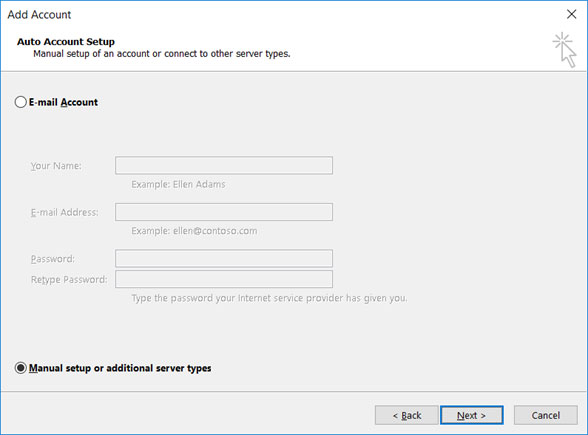
Step 3: Select POP or IMAP > Next
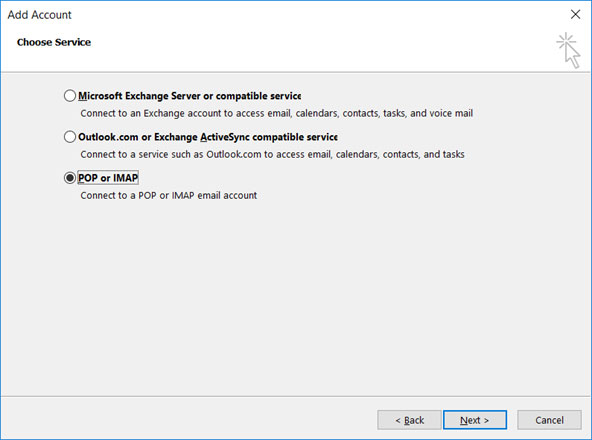
Step 4: . Enter all the relevant details (Select POP or IMAP according to your preference) and then click More Settings
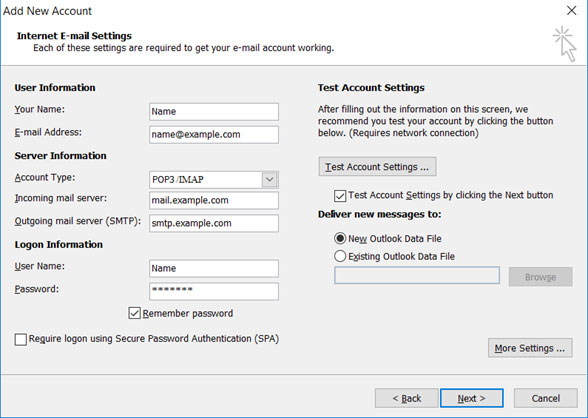
Step 5: Click on the Outgoing Server tab and ensure that the My outgoing server (SMTP) requires authentication checkbox is selected, as well as Use same settings as my incoming mail server
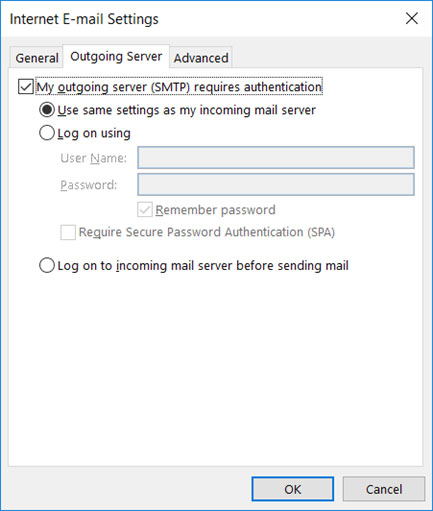
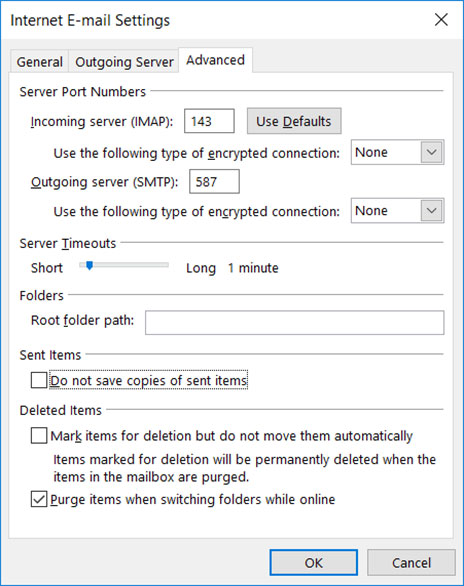
Step 6: Select the Advanced tab
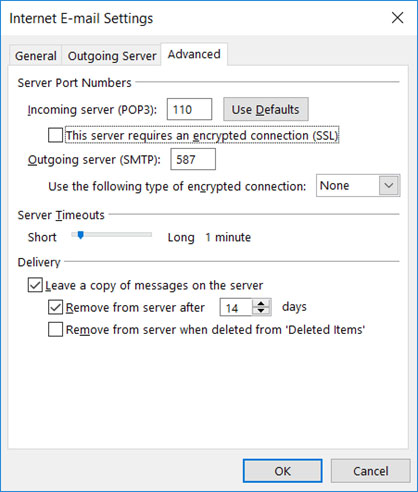
Step 7: Ensure that your settings are as below for your choice of either POP or IMAP:
POP port settings for NETSCAPE.NET
- Incoming Port: 110, Outgoing Port: 587
- General settings for POP
- Secure – Port: 995 and Security Type: SSL/TLS (Accept all certificates)
- Insecure – Port: 110 and Security Type: None (Accept all certificates)
- Not ticked: This server requires an encrypted connection (SSL)
- Use the following type of encrypted connection is None
IMAP port settings for yourdomain.tld
- Incoming Port: 143, Outgoing Port: 587
- Secure – Port: 993and Security Type: SSL/TLS (Accept all certificates)
- Insecure – Port: 143 and Security Type: None (Accept all certificates
- Not ticked: This server requires an encrypted connection (SSL)
- Use the following type of encrypted connection is None
Note: If you use Secure SSL / TLS Settings, check the “This service requires a secure connection (SSL)” box in both outgoing and Incoming mails.
General SMTP port settings for yourdomain.tld
- Outgoing (SMTP) Secure – Port: 465 for and Security Type: SSL/TLS (Accept all certificates)
- Outgoing (SMTP roaming server) Secure – Port: 587 and Security Type: SSL/TLS (Accept all certificates)
- Outgoing (SMTP) – Port: 25 and Security Type: None (Accept all certificates)
- Outgoing (SMTP roaming server) Insecure – Port: 587 and Security Type: None (Accept all certificates)
Step 8: Click OK to save these settings
Step 9: Click Next and Finish
Congratulations! You are all done here and ready to use your email account on Outlook 2013.
Outlook 2010 Mail Setup
Step 1: Launch Outlook 2010. Select Tools from the top menu bar, then Accounts Settings
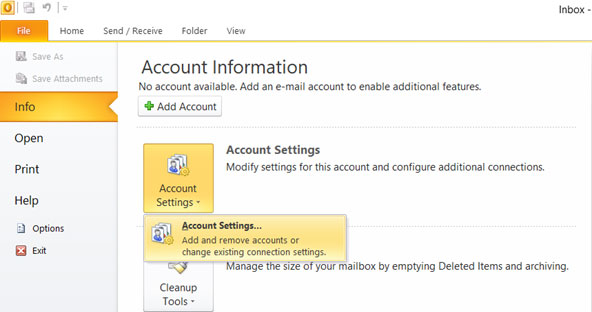
Step 2: On the Account Settings screen, click New on the E-mail tab
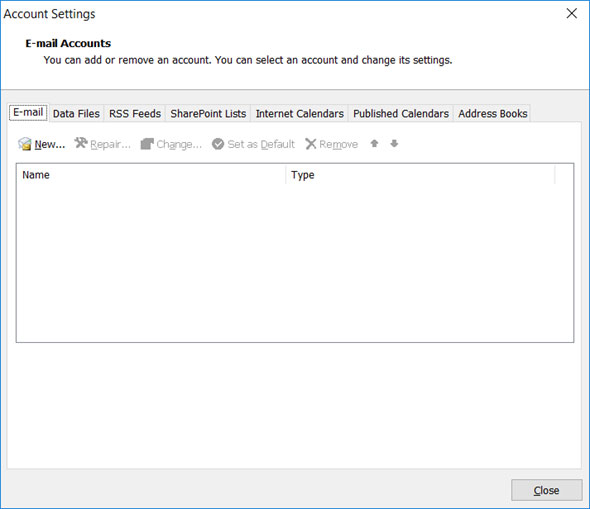
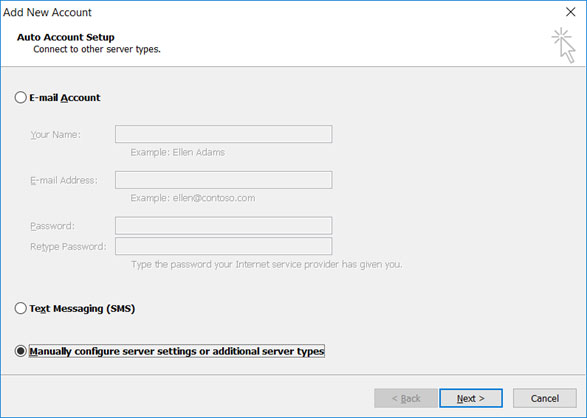
Step 3: In the Add New Account box choose Manual setup or additional server types > Next
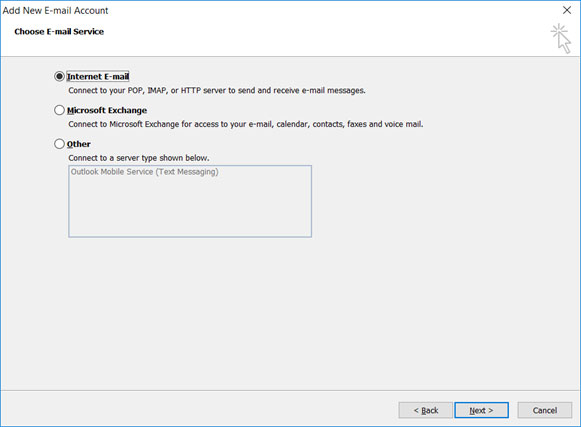
Step 4: Select Internet E-mail and click Next
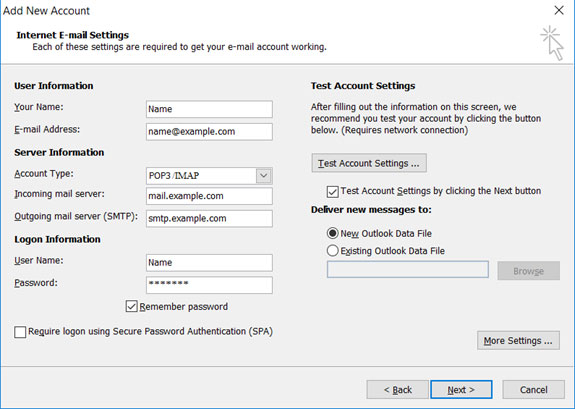
Step 5: Enter all the relevant details (Select POP or IMAP according to your preference) and then click More Settings
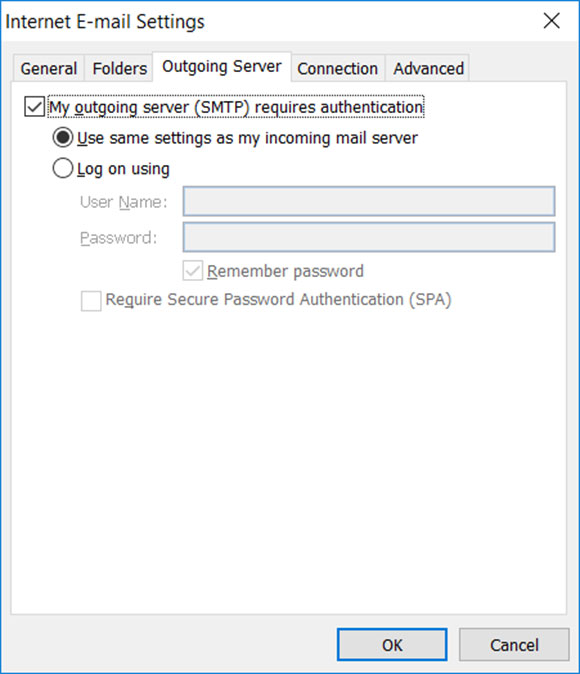
Step 6: Click on the Outgoing Server tab and ensure that the My outgoing server (SMTP) requires authentication checkbox is selected, as well as Use same settings as my incoming mail server
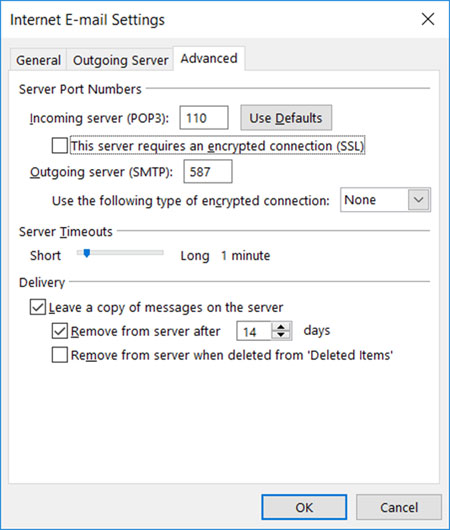
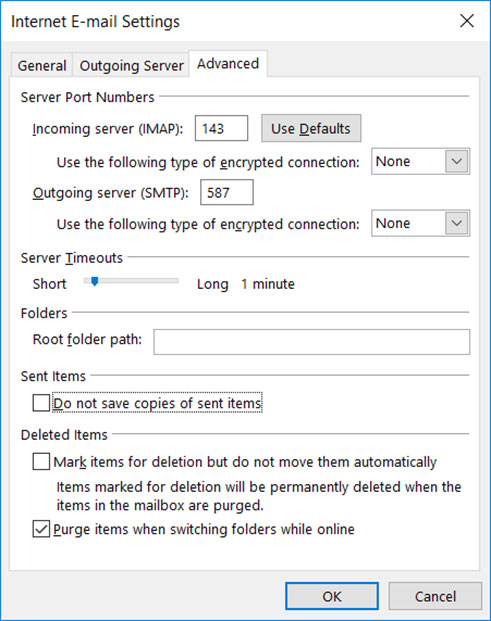
Step 7: Select the Advanced tabEnsure that yourdomain.tld settings are as below for your choice of either POP or IMAP.
POP port settings for yourdomain.tld
- Incoming Port: 110, Outgoing Port: 587
- General settings for POP
- Secure – Port: 995 and Security Type: SSL/TLS (Accept all certificates)
- Insecure – Port: 110 and Security Type: None (Accept all certificates)
- Not ticked: This server requires an encrypted connection (SSL)
- Use the following type of encrypted connection is None
IMAP port settings for yourdomain.tld
- Incoming Port: 143, Outgoing Port: 587
- Secure – Port: 993and Security Type: SSL/TLS (Accept all certificates)
- Insecure – Port: 143 and Security Type: None (Accept all certificates
- Not ticked: This server requires an encrypted connection (SSL)
- Use the following type of encrypted connection is None
Note: If you use Secure SSL / TLS Settings, check the “This service requires a secure connection (SSL)” box in both outgoing and Incoming mails.
General SMTP port settings for yourdomain.tld
- Outgoing (SMTP) Secure – Port: 465 for and Security Type: SSL/TLS (Accept all certificates)
- Outgoing (SMTP roaming server) Secure – Port: 587 and Security Type: SSL/TLS (Accept all certificates)
- Outgoing (SMTP) – Port: 25 and Security Type: None (Accept all certificates)
- Outgoing (SMTP roaming server) Insecure – Port: 587 and Security Type: None (Accept all certificates)
Step 8: Click OK to save these settings
Step 9: Click Next and Finish
Congratulations! You are all done here and ready to use your email account on Outlook 2010.
Outlook 2007 Mail Setup
Step 1: Launch Outlook 2007. Select Tools from the top menu bar, then Accounts Settings
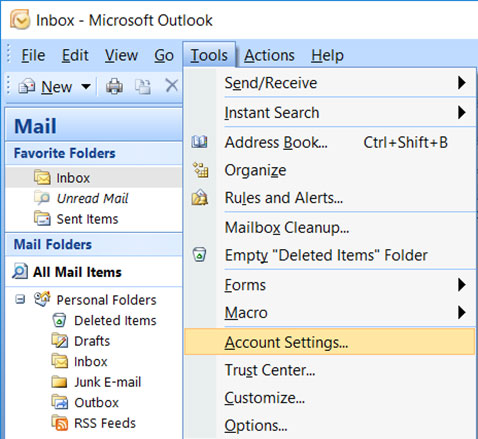
Step 2: On the Account Settings screen, click New on the E-mail tab
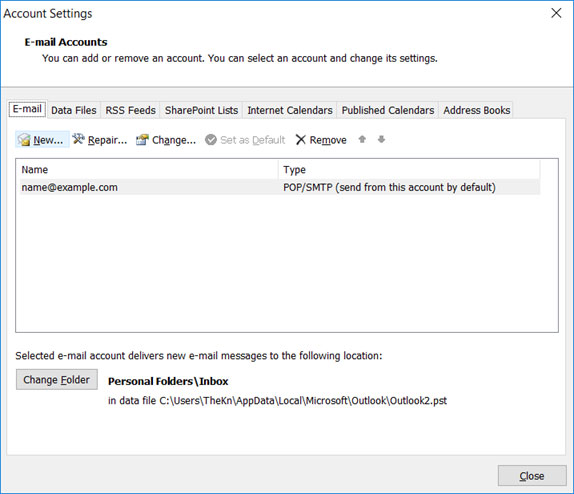
Step 3: Select Microsoft Exchange, POP3, IMAP or HTTPand click Next
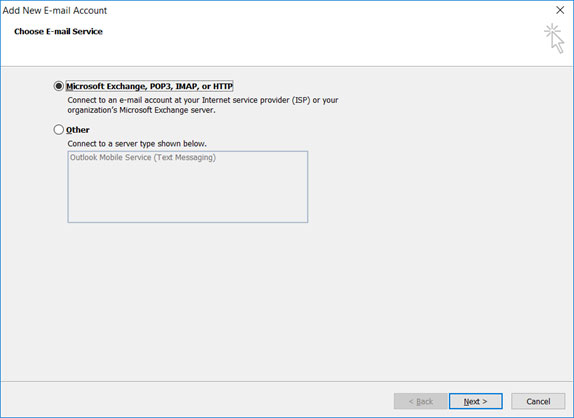
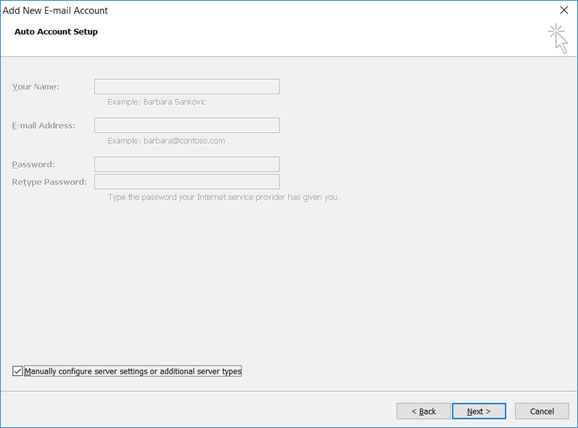
Step 4: Tick the Manually configure server settings or additional server types checkbox and click Next
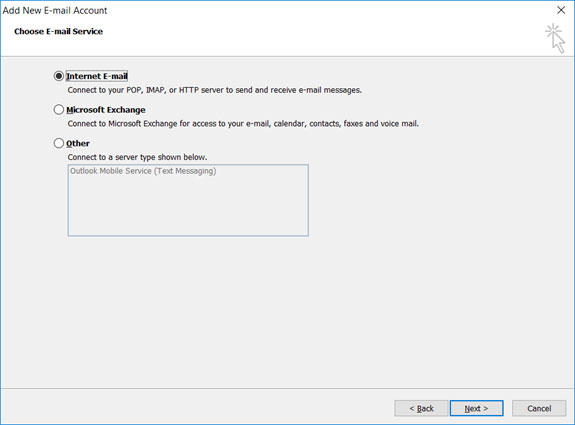
Step 5: Select Internet E-mail and then click Next
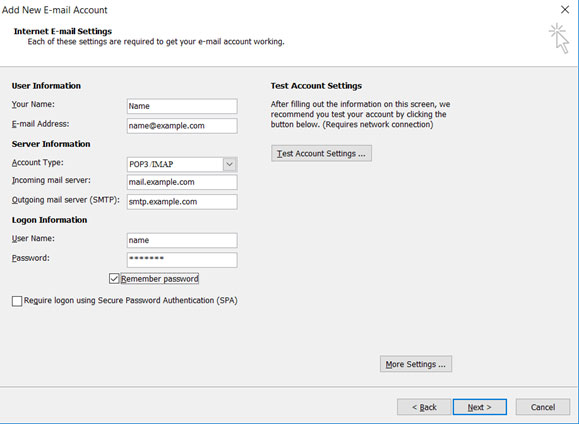
Step 6: Enter all the relevant details (choose either POP or IMAP according to your needs) and then click More Settings
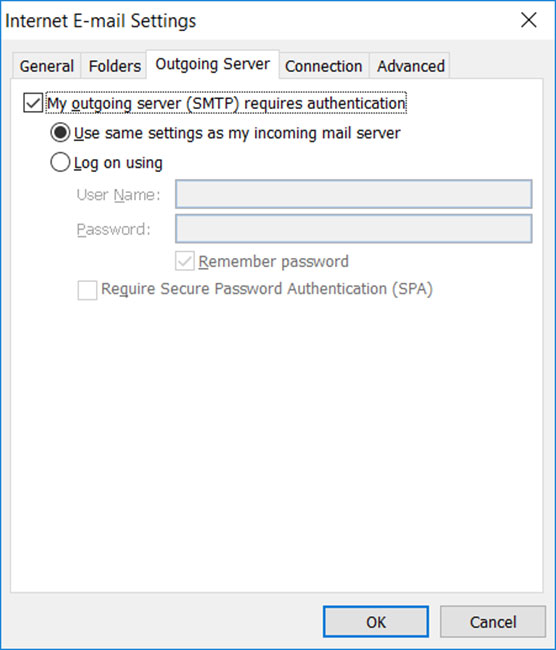
Step 7: Click on the Outgoing Server tab and ensure that the My outgoing server (SMTP) requires authentication checkbox is selected, as well as Use same settings as my incoming mail server
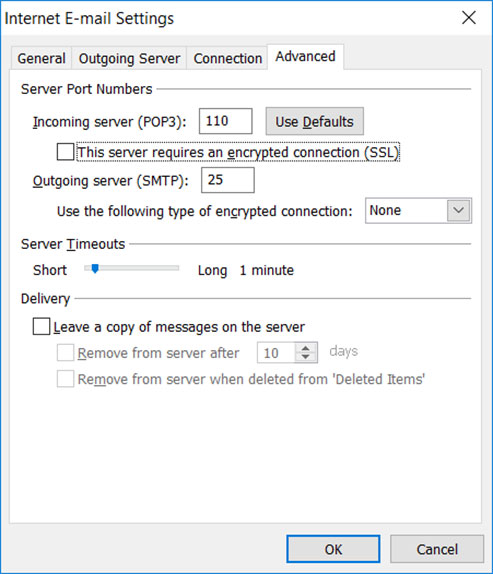
Step 9: Select the Advanced tab. Ensure that yourdomain.tld settings are as below for your choice of either POP or IMAP.
POP port settings for yourdomain.tld
- Incoming Port: 110, Outgoing Port: 587
- General settings for POP
- Secure – Port: 995 and Security Type: SSL/TLS (Accept all certificates)
- Insecure – Port: 110 and Security Type: None (Accept all certificates)
- Not ticked: This server requires an encrypted connection (SSL)
- Use the following type of encrypted connection is None
IMAP port settings for yourdomain.tld
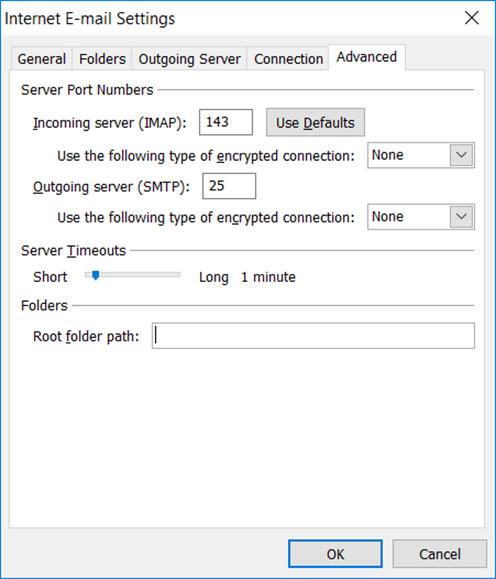
- Incoming Port: 143, Outgoing Port: 587
- Secure – Port: 993and Security Type: SSL/TLS (Accept all certificates)
- Insecure – Port: 143 and Security Type: None (Accept all certificates
- Not ticked: This server requires an encrypted connection (SSL)
- Use the following type of encrypted connection is None
Note: If you use Secure SSL / TLS Settings, check the “This service requires a secure connection (SSL)” box in both outgoing and Incoming mails.
General SMTP port settings for yourdomain.tld
- Outgoing (SMTP) Secure – Port: 465 for and Security Type: SSL/TLS (Accept all certificates)
- Outgoing (SMTP roaming server) Secure – Port: 587 and Security Type: SSL/TLS (Accept all certificates)
- Outgoing (SMTP) – Port: 25 and Security Type: None (Accept all certificates)
- Outgoing (SMTP roaming server) Insecure – Port: 587 and Security Type: None (Accept all certificates)
Step 10: Click OK to save these settings
Step 11: Click Next and Finish
Congratulations! You are all done here and ready to use your email account on Outlook 2007
Outlook Express 6.0 Mail Setup
To setup your Outlook Express 6.0 to handle your new POP3 e-mail account, please follow the instruction below :
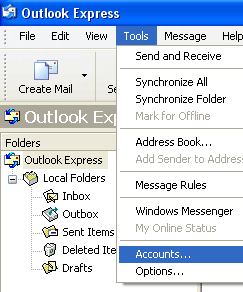
| 1. Select Tool -> Accounts… to start the Options dialog box.
2. Click button Add and select Mail… to start the Internet Connection Wizard. |
|
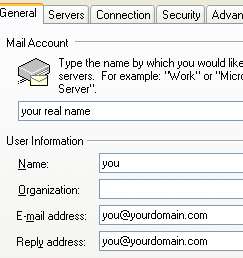
| 3. Enter Your Name in the display name field. This name will appear in the From field of the outgoing message. Type your name as it would you like to appear. Click Next > button.
4. Enter your e-mail address in the E-mail address field. For example You@Yourdomain.com.
|
|
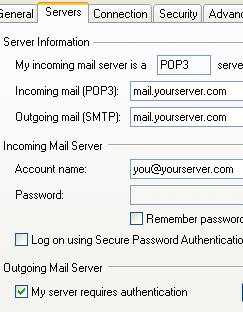
| 5. Click Next > button to fill out the Incoming mail (POP3 or IMAP) server and Outgoing mail (SMTP) server field with your domain name. If you domain name is yourdomain.com then fill in mail.yourdomain.com for both fields.
Make sure you check the box for My Server Requires Authentication for the Outgoing Mail Server only (Not for the Incoming mail Server) 6. Click Next > button to enter your Internet Mail Logon information. Enter your full e-mail address in the POP account name field and enter your password in the Password field. |
|
| 7. Click Next > button to enter a friendly name for your new mail account to be setup then click Next > button again to select your connection type.
8. Click Next > button and Finish button to end the setting. |
|
Apple Iphone Mail Setup
Step 1: Select the Settings icon on your home screen
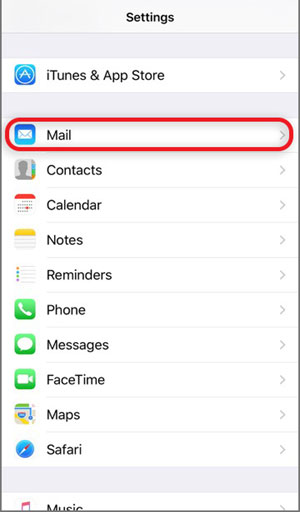
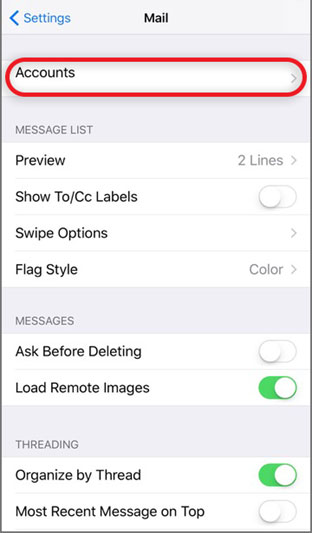
Step 2: Select Mail
Step 3: Select Accounts
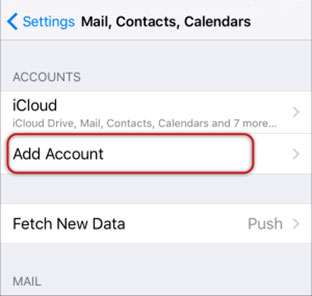
Step 4: Select Add Account
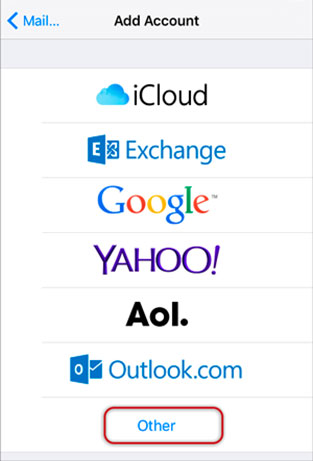
Step 5: Select Other from the menu
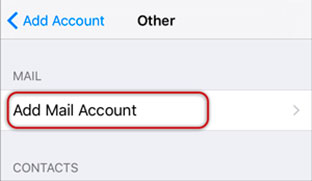
Step 6: Select Add Mail Account
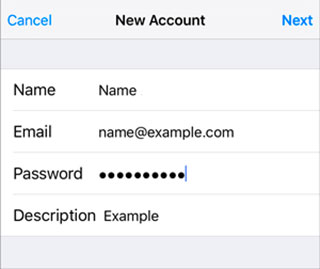
Step 7: Enter your Name, Email & Password and then click Next
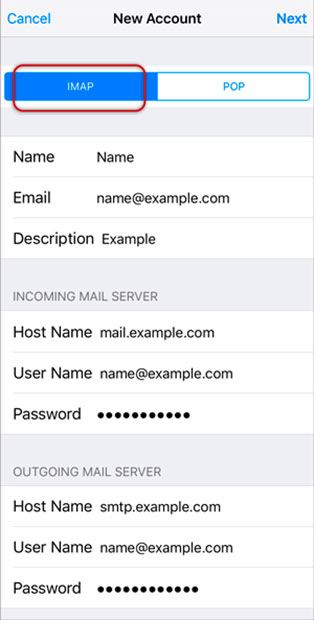
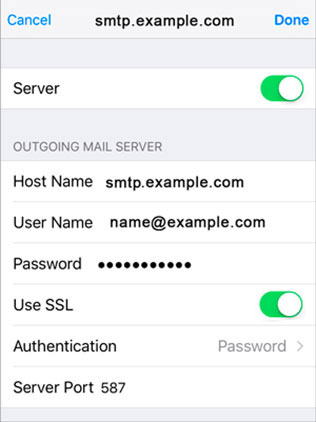
Step 8: Select IMAP . Scroll down to Incoming Mail Server and enter all the relevant details, then do the same for Outgoing Mail Server, as in the screen below and then select Next.
- Ensure that User Name is the full email address. User Name & Password are the same for both Incoming & Outgoing servers.
- Incoming Mail Server Host Name is mail.example.com
- Outgoing Mail Server Host Name is mail.example.com
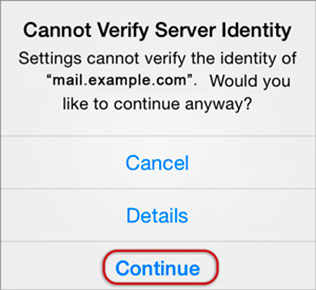
Step 9: You may receive a prompt asking you to verify the incoming and outgoing servers – you can click continue for each or tap “Details” and then tap “Trust”
Step 10: Save
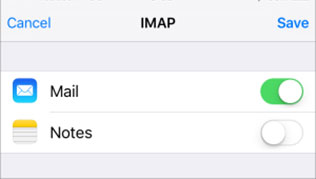
Step 11: Choose the new account that you’ve just created
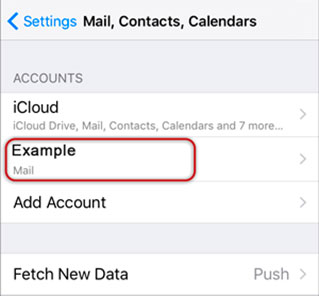
Step 12: Choose the SMTP server
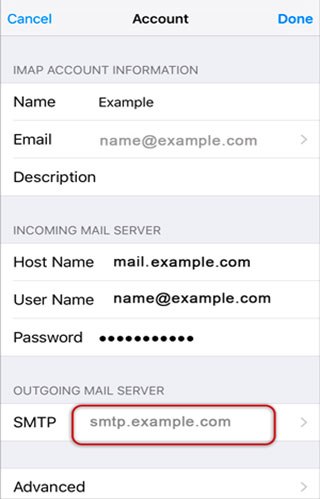
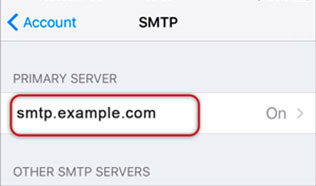
Step 13: Check the SMTP settings and click Done
- Outgoing Mail Server Host Name for yourdomain.tld is mail.example.com
- User Name: Full yourdomain.tld email address
- Password: Your email password
- Use SSL is On. You can also turn it off and use the correct Port number as below.
- Outgoing (SMTP) Secure – Port: 465 for and Security Type: SSL/TLS (Accept all certificates)
- Outgoing (SMTP roaming server) Secure – Port: 587 and Security Type: SSL/TLS (Accept all certificates)
- Outgoing (SMTP) – Port: 25 and Security Type: None (Accept all certificates)
- Outgoing (SMTP roaming server) Insecure – Port: 587 and Security Type: None (Accept all certificates)
- Authentication is Password
- Server Port is 587
Congratulations! You are all done here and ready to use your email account on your iPhone.
Android Phone Mail Setup
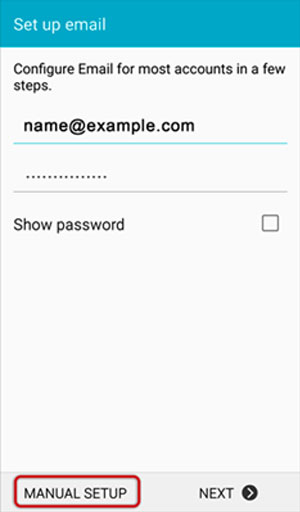
Step 1: Start by selecting the Mail icon from your applications screen. Enter the email address and email password. Choose Manual Setup
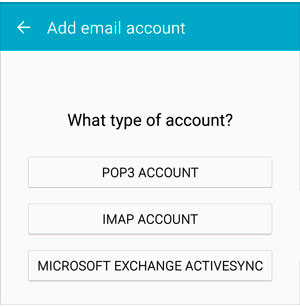
Step 2: Choose IMAP
Step 3: If you have choosen IMAP make sure to enter the below settings and click Next
- IMAP Server: mail.example.com
- Security type is None
- Port is 143 for IMAP
- Secure – Port: 993and Security Type: SSL/TLS (Accept all certificates)
- Insecure – Port: 143 and Security Type: None (Accept all certificates)
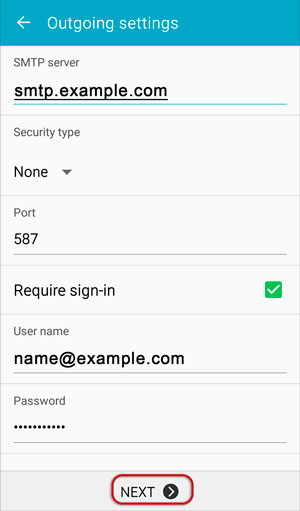
Step 4: Enter the below outgoing SMTP Settings for NETSCAPE.NET and click Select Next
- SMTP Server: smtp.example.com
- Security type is None
- Port is 587 for outgoing SMTP
- Outgoing (SMTP) Secure – Port: 465 for and Security Type: SSL/TLS (Accept all certificates)
- Outgoing (SMTP roaming server) Secure – Port: 587 and Security Type: SSL/TLS (Accept all certificates)
- Outgoing (SMTP) – Port: 25 and Security Type: None (Accept all certificates)
- Outgoing (SMTP roaming server) Insecure – Port: 587 and Security Type: None (Accept all certificates)
Step 5: Select Done. Congratulations! You are all done here and ready to use your email account on your Android phone.
Apple Mail Setup
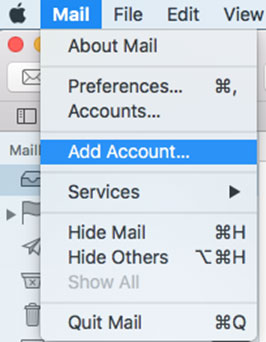
Step 1: Launch Mail App. From the toolbar at the top, select Mail and then Add Account
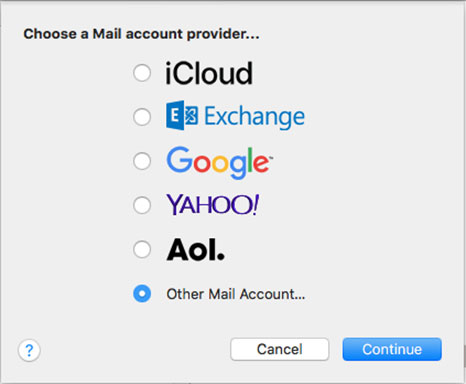
Step 2: You can choose the automatic configuration of the email for the known used email accounts from the list and if you do not, you should choose Other Mail Account and setup your email manually
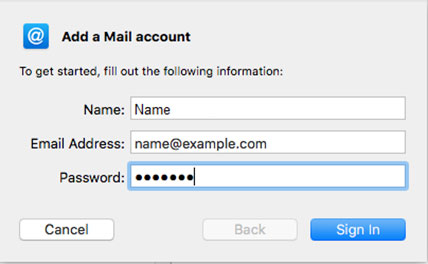
Step 3: Enter your details and then click Sign In
- Your name : Type your name. This is the name of the sender in email messages that you send from this account
- Email address : Full NETSCAPE.NET email address
- Password : Email account password
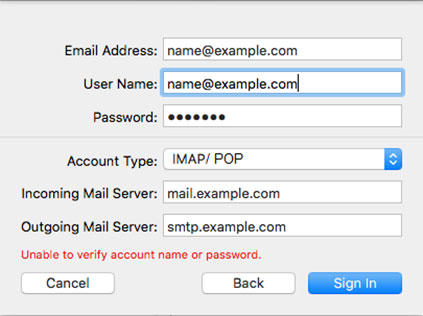
Step 4: Complete the settings as follows and click Sign In
- Email Address & User Name: Your full yourdomain.tld email address
- Password: Your yourdomain.tld password
- Account Type is IMAP or POP according to preference (IMAP is the default).
- Incoming Mail Server Host Name for yourdomain.tld is mail.yourdomain.tld
- Outgoing Mail Server Host Name for yourdomain.tld is mail.yourdomain.tld
- For domains still in transfer or propagation, temporarily use the IP Address in place of Incoming & Outgoing Mail Server
- Ignore Unable to verify account name or password
Step 5: Ignore the 2 server identity messages > Continue. You can add the certificate to your trust settings to avoid seeing this message in the future.
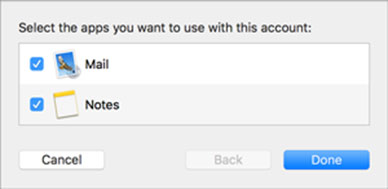
Step 6: Select any apps > Done
Congratulations! You are all done here and ready to use your email account on your Apple Mail.
Netscape 7.0 Mail Setup
- Open Netscape Mail 7.x.
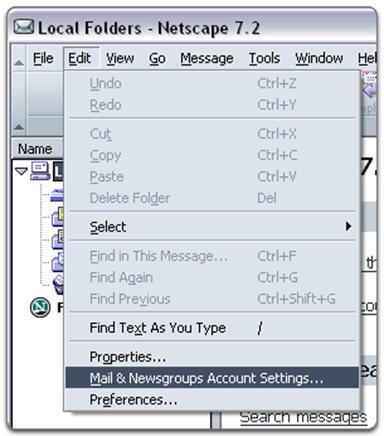
- Click ‘Edit,’ and select ‘Mail & Newsgroups Account Settings…’
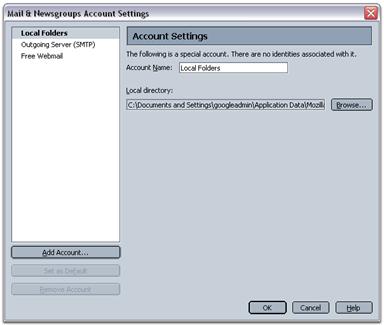
- Click ‘Add Account…,’ and click ‘OK.’
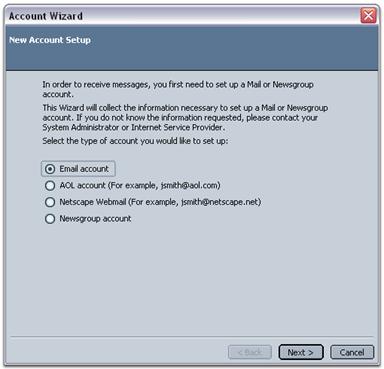
- Choose ‘Email account,’ and click ‘Next.’
- Enter your name in the ‘Your Name:’ field.
- Enter your full email address (username@yourdomain.tld) in the ‘Email Address:’ field, and click ‘Next.’
- Select ‘POP’ and enter ‘mail.yourdomain.tld’ in the ‘Incoming Server:’ field.
- Enter ‘mail.yourdomain.tld’ in the ‘Outgoing Server:’ field.
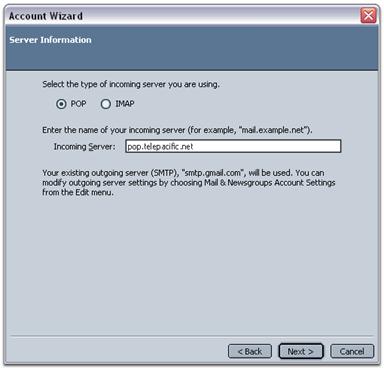
- Click ‘Next.’
- Enter your username (including ‘@yourdomain.tld’) in the ‘Incoming User Name:’ field and the ‘Outgoing User Name:’ field, and click ‘Next.’
- Enter a name for your Netscape Mail account in the ‘Account Name field,’ and click ‘Next.’
- Click ‘Next,’ and then click ‘Finish.’ (Don’t worry if you get an error message indicating that you cannot connect to mail.yourdomain.tld. Just click ‘OK,’ and continue with the steps below.)
- Open the ‘Edit’ menu, and select ‘Mail and Newsgroups Account Settings.’
- The ‘Port’ should read 110.
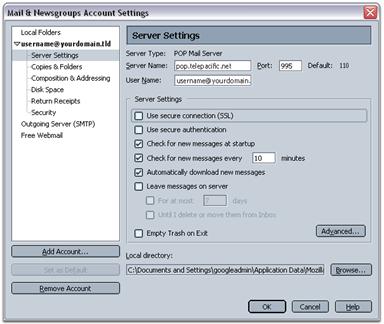
- Enter ’25’ in the ‘Port:’ field.
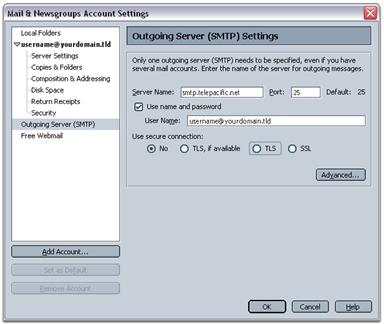
Congratulations! You’re done configuring your client to send and retrieve messages.
EUDORA 5.2.1 Mail Setup
https://www.xgentech.com/wp-content/uploads/2019/05/
You can get a freeware version of Eudora Mail at http://www.eudora.com/download/.
To setup your Eudora Mail 5.2.1 to handle your new POP3 e-mail account, please follow the instruction below :-
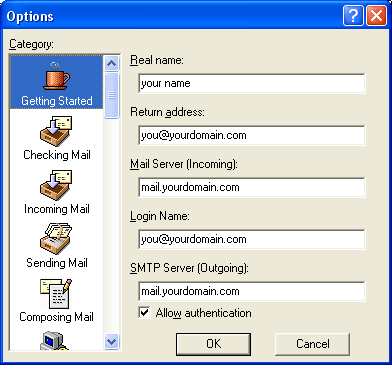
1. Select Tool -> Options… to start the Options dialog box.
2. Then select Getting Started in the Category
3. Enter the name you wish to appear to others when they receive your mail under the Real Name.
4. Enter the return address you wish to appear on your E-mail (you@yourdomain.com) under the Reply Mail.
5. Enter mail.yourdomain.com (replace yourdomain.com with your proper domain) under Mail Server (Incoming)
6. Enter your full email address under this domain (e.g. you@yourdomain.com) for your Login Name
7. Enter mail.yourdomain.com (replace yourdomain.com with your proper domain) under SMTP Server (Outgoing)
8. And ensure that the Allow Authentication box is checked
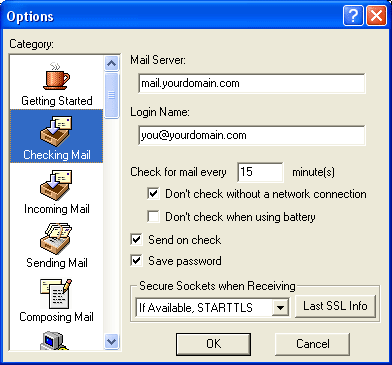
9. Click on Checking Mail
10. Ensure that the Mail Server reads mail.yourdomain.com
11. Make sure your Login Name is the same as before and is correct
12. Leave the rest of the options as default
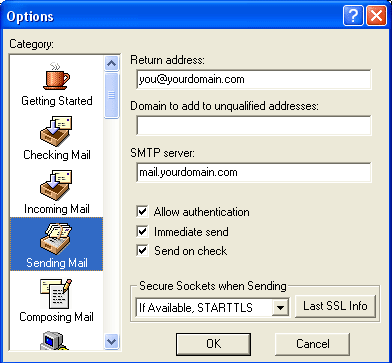
13. Click on Sending Mail
14. Ensure that the Return Address reads the correct reply address or simply leave blank.
15. Ensure that the SMTP Server reads mail.yourdomain.com
16. Ensure that the Allow Authentication box is checked
17. Click OK to save your mail account settings.
– END –

